Custom fields in Partnerplace
Custom Fields in Partnerplace allow you to extend the default data structure by adding fields specific to your business requirements. You can create custom fields for both Partners and Leads, enabling you to capture, track, and manage information that's unique to your organization's workflow.
Custom fields provide flexibility to:
- Track industry-specific information not covered by standard fields
- Capture additional partner or lead attributes relevant to your business
- Create custom filters and reports based on your data
- Organize and categorize data according to your processes
- Control what information is visible to vendors versus partners
Accessing Custom Fields Settings
To access Custom Fields configuration:
- Click on Administrator Panel in the left sidebar navigation
- Expand the Administrator Panel menu
- Select Custom fields from the submenu
- You'll see two sections: Custom partner fields and Custom lead fields
The Custom Fields page displays tables for both partner and lead custom fields, with an "Add new field" button for each section.
Custom Fields Management Interface
The Custom Fields page is divided into two main sections:
Custom Partner Fields Section
This section displays all custom fields created for partners. The table includes the following columns:
- Action: Edit or delete buttons for each field
- Field name: The name of the custom field
- Field type: The data type (text, numeric, yes/no answer, or tags)
- Field visibility: Who can see the field (Vendor only or Vendor and partner)
- Show field in partner list: Whether the field appears as a column option in partner lists
- Default value: The pre-populated value (if any)
Custom Lead Fields Section
This section displays all custom fields created for leads. The table includes the same columns as partner fields, plus one additional column:
- Action: Edit or delete buttons for each field
- Field name: The name of the custom field
- Field type: The data type (text, numeric, yes/no answer, or tags)
- Field visibility: Who can see the field (Vendor only or Vendor and partner)
- Show field in lead list: Whether the field appears as a column option in lead lists
- Show field in lead form: Whether the field appears in the "Add New Lead" form
- Default value: The pre-populated value (if any)
Field Types
Partnerplace supports four types of custom fields. Select the appropriate type when creating a new field using the Field type dropdown:
Text
Allows entry of text-based information such as names, descriptions, or identifiers.
Use cases: Certification names, project identifiers, partner classifications, reference codes, notes
Numeric
Accepts numerical values only, useful for quantities, scores, or ratings.
Use cases: Partner tier levels, deal scores, capacity numbers, performance ratings, revenue targets
Yes/No Answer
A toggle field that accepts only true/false or yes/no values.
Use cases: Certification status, compliance flags, qualification criteria, feature requirements, approval status
Tags
A dropdown field that allows selection from predefined options. You define the available options when creating the field.
Use cases: Partner categories, lead sources, priority levels, status indicators, regions
Configuration: Define values in the "Default value" field using commas or semicolons to separate options (e.g., "Option 1; Option 2; Option 3"). By default, the field remains empty even when options are defined, allowing users to select the appropriate value.
Creating a Custom Partner Field
Step-by-Step Guide
- Navigate to Custom Fields: Go to Administrator Panel > Custom fields
- Locate Custom Partner Fields: Find the "Custom partner fields" section at the top of the page
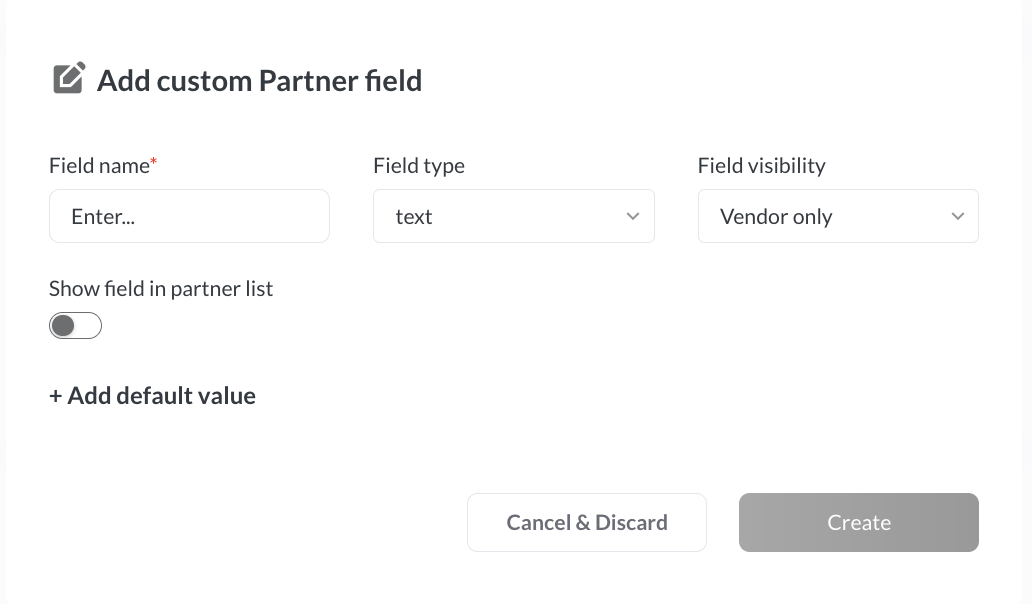
- Click "Add new field": This opens the "Add custom Partner field" dialog
- Configure the field:
- Field name* (required): Enter a descriptive name in the text field
- Field type: Select from the dropdown (text, numeric, yes/no answer, or tags)
- Field visibility: Choose from the dropdown:
- Vendor only - Only vendor users can see and edit
- Vendor and partner - Both vendors and partners can see and edit
- Show field in partner list: Toggle this switch to enable/disable the field as a column in partner lists
- + Add default value: (Optional) Click to expand and add a default value for the field
- Save the field: Click the Create button (bottom right)
- Cancel if needed: Click Cancel & Discard to exit without saving
Field Configuration Options
Field Name (Required)
This is the label that will appear next to the field throughout Partnerplace. Enter a clear, descriptive name that users will easily understand. The field is marked with an asterisk (*) indicating it's required.
Best practices:
- Use clear, concise names (e.g., "Certification Level" instead of "Cert Lvl")
- Be consistent with capitalization
- Avoid special characters that might cause display issues
- Consider how the name will appear in narrow column headers
Field Type
Select the appropriate data type from the dropdown menu. This determines what kind of information can be entered in the field.
Important: The field type cannot be changed after the field contains data. Choose carefully!
Field Visibility
This dropdown controls who can view and edit the field:
- Vendor only: The field appears only for vendor users. Partners will not see this field anywhere in the system.
- Vendor and partner: The field is visible to both vendor and partner users. Both can view and edit the values.
Note: Field visibility can be changed even after the field contains data.
Show Field in Partner List
This toggle switch controls whether the custom field is available as a column in partner list views.
When enabled:
- The field becomes available in the table configuration options
- Users can add it as a column in their partner list view
- The field appears on the right side of the Stage column
- The field becomes available as a filter option
- Data can be sorted by this field
When disabled: The field only appears on partner details pages.
Add Default Value (Optional)
Click the "+ Add default value" link to expand this section and set a pre-populated value for the field.
Uses for default values:
- Text fields: Set a standard text that appears by default
- Numeric fields: Set a starting number
- Yes/No fields: Set the default toggle state (Yes or No)
- Tags fields: Define all available options using semicolons or commas (e.g., "Bronze; Silver; Gold; Platinum")
Note: Default values only apply to newly created records, not existing ones.
Creating a Custom Lead Field
Step-by-Step Guide
- Navigate to Custom Fields: Go to Administrator Panel > Custom fields
- Locate Custom Lead Fields: Scroll to the "Custom lead fields" section
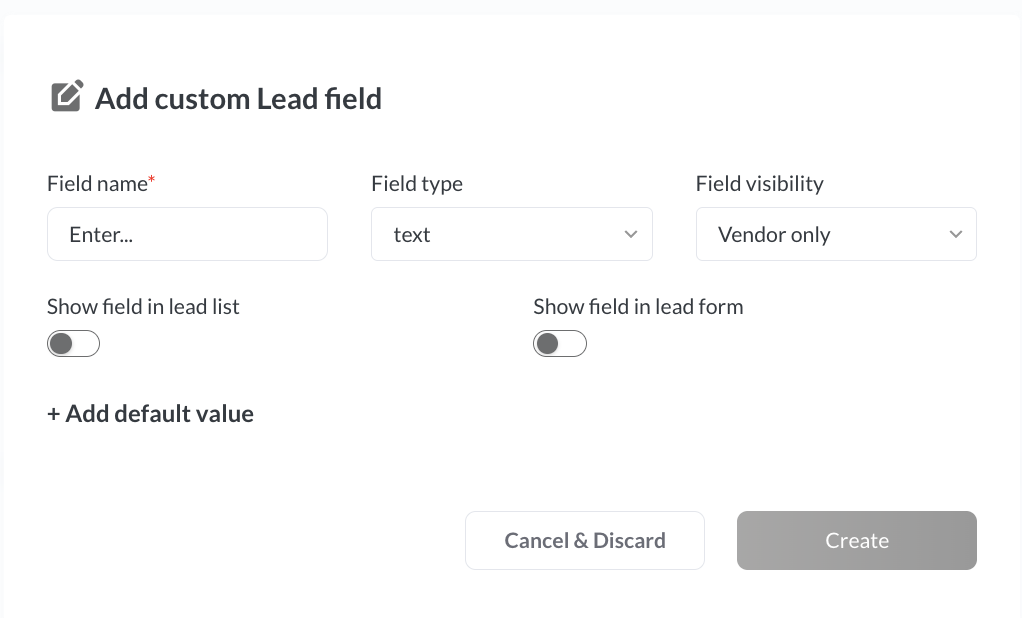
- Click "Add new field": This opens the "Add custom Lead field" dialog
- Configure the field:
- Field name* (required): Enter a descriptive name
- Field type: Select from the dropdown (text, numeric, yes/no answer, or tags)
- Field visibility: Choose "Vendor only" or "Vendor and partner"
- Show field in lead list: Toggle to enable/disable the field in lead list views
- Show field in lead form: Toggle to enable/disable the field in the "Add New Lead" form
- + Add default value: (Optional) Click to add a default value
- Save the field: Click the Create button
- Cancel if needed: Click Cancel & Discard to exit without saving
Key Difference: Show Field in Lead Form
Lead custom fields have an additional option not available for partner fields: "Show field in lead form"
When enabled:
- The custom field appears in the "Add New Lead" form
- Users can populate the field when creating new leads
- The field appears in the default fields section of the form
- Field visibility settings are respected (Vendor only vs Vendor and partner)
When disabled:
- The field only appears on lead details pages
- Users must edit the lead after creation to populate the field
Best practice: Enable "Show field in lead form" for fields that should be captured at the point of lead entry, such as lead source, initial priority, or qualification criteria. Disable it for fields that will be populated later in the lead lifecycle.
Display Settings Comparison
| Setting | Partner Fields | Lead Fields | Description |
|---|---|---|---|
| Show field in list | ✓ Available | ✓ Available | Makes field available as a column and filter in list views |
| Show field in form | ✗ Not available | ✓ Available | Displays field in the "Add New Lead" form during creation |
| Show in details page | ✓ Always shown | ✓ Always shown | Custom fields always appear on partner/lead details pages |
Using Custom Fields
Viewing Custom Fields in Details Pages
Partner Details: Custom partner fields appear in the third row of fields on the partner details page, below the standard partner information fields.
Lead Details: Custom lead fields appear on the lead details page according to your configuration and visibility settings.
Fields display according to their visibility settings:
- Vendor users see all custom fields (both "Vendor only" and "Vendor and partner" fields)
- Partner users see only fields marked as "Vendor and partner"
Adding Custom Fields to List Views
If you enabled "Show field in partner list" or "Show field in lead list" when creating the field:
- Navigate to your Partners list or Leads list
- Click on the Table Configuration or column settings icon
- Find your custom field in the list of available columns
- Enable the checkbox next to your custom field
- The field will appear as a column on the right side of the Stage column
- You can now sort and filter by this field
Using Custom Fields in Lead Forms
If you enabled "Show field in lead form" for a lead custom field:
- Navigate to Add Lead or click "Add New Lead"
- Complete the standard required fields (Partner, Client Name, etc.)
- Scroll down to find your custom field in the form
- Fill in the custom field value according to its type:
- Text: Type the desired text
- Numeric: Enter a number
- Yes/No: Toggle the switch
- Tags: Select from the dropdown options
- Complete the rest of the form and submit
The custom field values will be saved with the new lead record and visible in the lead details page.
Editing Custom Field Values
To edit values in custom fields:
- Open the partner or lead details page
- Locate the custom field you want to edit
- Click on the field value or edit icon
- Enter or select the new value
- Save your changes
Note: Edit permissions respect the field visibility settings. Partner users can only edit fields marked as "Vendor and partner."
Filtering by Custom Fields
When a custom field is enabled in list view, it automatically becomes available as a filter:
- Navigate to the Partners or Leads list page
- Ensure the custom field is enabled in your table configuration
- Click on the Filter or search icon
- Locate your custom field in the filter options
- Set filter criteria based on the field type:
- Text: Enter search text (supports partial matching)
- Numeric: Set range or specific values
- Yes/No: Select Yes, No, or both
- Tags: Select one or more options from the list
- Apply the filter to see matching records
Managing Existing Custom Fields
Editing Custom Fields
To modify an existing custom field:
- Navigate to Administrator Panel > Custom fields
- Find the field in the appropriate table (partner or lead fields)
- Click the Edit button in the Action column
- The "Edit custom Partner field" or "Edit custom Lead field" dialog opens
- Make your changes (see restrictions below)
- Click Save Changes
Editing Restrictions
Once a custom field contains data, certain restrictions apply:
| Field Property | Can Edit When Field Has Data? | Notes |
|---|---|---|
| Field Name | ✓ Yes | Can be changed at any time |
| Field Type | ✗ No | Cannot be changed once data exists |
| Field Visibility | ✓ Yes | Can be changed; updates who can see existing data |
| Show in List | ✓ Yes | Can be toggled on/off at any time |
| Show in Form (leads only) | ✓ Yes | Can be toggled on/off at any time |
| Default Value | ✓ Yes | Can be updated; applies only to new records |
Deleting Custom Fields
Custom fields can only be deleted if they are unused or unfilled:
- Unused fields: Fields that have never contained data can be deleted freely
- Filled fields: Fields containing data in any record cannot be deleted to prevent data loss
To delete an unused custom field:
- Navigate to Administrator Panel > Custom fields
- Find the field in the table
- Click the Delete button in the Action column
- Confirm the deletion when prompted
If you need to remove a field that contains data:
- Navigate to each partner or lead record that uses this field
- Manually clear the field value (make it empty)
- Once all records are cleared, return to Custom fields settings
- The Delete button will now be available
Alternative approach - Hide instead of delete:
- Edit the field settings
- Disable "Show field in partner list" or "Show field in lead list"
- Disable "Show field in lead form" (for lead fields)
- Change visibility to "Vendor only" to restrict access
- The field will remain in the database but won't be prominently displayed
Field Visibility Matrix
| Visibility Setting | Vendor Can View | Vendor Can Edit | Partner Can View | Partner Can Edit |
|---|---|---|---|---|
| Vendor only | Yes | Yes | No | No |
| Vendor and partner | Yes | Yes | Yes | Yes |
Best Practices
Planning Your Custom Fields
- Start with requirements: Document what additional information you need to track before creating fields
- Involve stakeholders: Consult with team members who will use the fields
- Consider field types carefully: Remember that field type cannot be changed once data exists
- Plan visibility strategically: Think about what partners should see vs. internal-only information
- Don't over-customize: Create only fields you'll actually use; too many custom fields can clutter the interface
Naming Conventions
- Use clear, descriptive names that indicate the field's purpose
- Be consistent with capitalization (e.g., always use title case)
- Avoid abbreviations unless they're universally understood
- Keep names concise enough to fit in table column headers
- Consider prefixing related fields (e.g., "Cert: Level", "Cert: Expiry Date")
Using Tags/Dropdown Fields Effectively
- Define all options upfront in the default value field
- Use semicolons (;) to separate options for better readability
- Keep option lists manageable (typically 10-15 options maximum)
- Order options logically (alphabetically, by priority, or by frequency of use)
- Use consistent terminology across related tags fields
- Review and update options periodically as business needs change
Display Settings Strategy
- Show in List: Enable for fields you frequently filter or sort by, or need to see at a glance
- Show in Form (leads): Enable for fields that should be captured at lead creation time
- Detail Page Only: Leave both toggles disabled for reference fields that don't need to be in lists or forms
Visibility Guidelines
- Vendor Only: Use for internal tracking, scoring, notes, or competitive information
- Vendor and Partner: Use for fields where partner input is valuable or partners need transparency
- Review visibility settings quarterly to ensure they align with your partnership model
- Consider regulatory or contractual requirements when setting visibility
Common Use Cases
Partner Custom Fields Examples
| Field Name | Field Type | Visibility | Show in List | Use Case |
|---|---|---|---|---|
| Certification Level | Tags | Vendor and partner | Yes | Track partner tier (Bronze, Silver, Gold, Platinum) |
| Territory | Tags | Vendor only | Yes | Assign geographic regions for territory management |
| Specialization | Tags | Vendor and partner | Yes | Identify partner focus areas or industries |
| Annual Revenue Target | Numeric | Vendor only | No | Set internal partnership revenue goals |
| Training Complete | Yes/No | Vendor and partner | Yes | Track certification or onboarding completion |
| Account Manager | Text | Vendor only | Yes | Assign internal ownership of partnership |
| Partner Since | Text | Vendor and partner | No | Record partnership start date |
| NDA Signed | Yes/No | Vendor only | Yes | Track legal compliance requirements |
Lead Custom Fields Examples
| Field Name | Field Type | Visibility | Show in List | Show in Form | Use Case |
|---|---|---|---|---|---|
| Lead Source | Tags | Vendor only | Yes | Yes | Track origin (Website, Event, Referral, Cold Call) |
| Priority Level | Tags | Vendor only | Yes | Yes | Indicate urgency (Low, Medium, High, Critical) |
| Qualification Score | Numeric | Vendor only | Yes | No | Rate lead quality (0-100 scale) |
| Budget Confirmed | Yes/No | Vendor and partner | Yes | No | Track qualification criterion |
| Product Interest | Tags | Vendor and partner | Yes | Yes | Identify specific solutions or products |
| Timeline | Tags | Vendor and partner | Yes | Yes | Expected close timeframe (Q1, Q2, 6+ months) |
| Competitor | Text | Vendor only | Yes | No | Track competitive situation |
| Technical Req Met | Yes/No | Vendor and partner | Yes | No | Technical qualification criteria |
Troubleshooting
-
Custom Field Not Appearing in List
Issue: A custom field doesn't appear as a column option in the partner or lead list.
Solutions:
- Verify that "Show field in partner list" or "Show field in lead list" toggle is enabled in the field settings
- Refresh the page (Ctrl+F5 or Cmd+Shift+R) to ensure settings have been applied
- Check table configuration to confirm you're looking in the right place for available columns
- Verify you have appropriate permissions to view the field based on visibility settings
- If you're a partner user, check if the field is set to "Vendor only" (you won't see it)
2.Custom Field Not Showing in Add Lead Form
Issue: A lead custom field doesn't appear in the "Add New Lead" form.
Solutions:
- Verify that "Show field in lead form" toggle is enabled in the field settings
- Check the field visibility setting - if you're logged in as a partner, ensure the field is set to "Vendor and partner"
- Clear browser cache and reload the form
- Ensure the field has been saved properly - try editing and saving the field again
- Check if you're using the correct form (some organizations have multiple lead forms)
3.Cannot Delete Custom Field
Issue: The delete option is not available or grayed out for a custom field.
Explanation: This field contains data in at least one record. Partnerplace prevents deletion to protect your data.
Solutions:
- To delete the field:
- Navigate to each partner or lead record that uses this field
- Clear the field value (make it empty)
- Once all records are cleared, return to Custom fields settings
- The delete button will now be available
- Alternative - Hide the field:
- Edit the field
- Disable "Show field in list" and "Show field in form" toggles
- Change visibility to "Vendor only" to restrict access
- The field remains in the database but won't be prominently displayed
4.Partner Cannot See Custom Field
Issue: Partner users cannot see a custom field that should be visible to them.
Solutions:
- Check the field visibility setting in Custom fields - it must be set to "Vendor and partner"
- Verify the partner user has proper access to view partner or lead details pages
- Ask the partner to log out and log back in to refresh their session permissions
- Confirm the field has been saved with the correct visibility setting (edit and check)
- Verify the partner is viewing the correct partner or lead record
5.Filter Not Working for Custom Field
Issue: Cannot filter by a custom field in the list view, or filter doesn't return expected results.
Solutions:
- Verify the field is enabled in your table configuration (custom columns must be visible to filter)
- Ensure "Show field in lead list" or "Show field in partner list" is enabled in field settings
- Refresh the page to ensure all configurations are loaded properly
- Check that the field contains data - empty fields may not appear in filter options
- For Tags fields, ensure you're selecting the exact option text (filters are case-sensitive)
- Clear other active filters that might be conflicting with your custom field filter
6.Wrong Field Type Selected
Issue: A field was created with the wrong data type and now needs to be changed.
Explanation: Field types cannot be changed once the field is created, regardless of whether it contains data.
Solutions:
- If the field doesn't contain data yet:
- Delete the incorrect field
- Create a new field with the correct field type
- Use the same field name if desired
- If the field already contains data:
- Create a new field with the correct field type and a slightly different name
- Manually transfer data from the old field to the new field (record by record)
- For large numbers of records, contact Partnerplace support for data migration assistance
- Once all data is transferred and verified, clear the old field from all records
- Delete the old field
7.Default Value Not Applying
Issue: Default values aren't appearing in new partner or lead records.
Solutions:
- Remember that default values only apply to newly created records, not existing ones
- For lead forms, ensure "Show field in lead form" is enabled to see the default value pre-populated
- Verify the default value was saved correctly by editing the field configuration and checking
- For Tags fields, ensure the default value matches one of the defined options exactly (case-sensitive)
- Try updating the default value, saving, and creating a test record to verify functionality
Getting Support
If you encounter issues not covered in this troubleshooting section, please contact Partnerplace support at support@partnerplace.io.
When contacting support about custom fields, please provide:
- The custom field name and type (Partner or Lead)
- Complete field configuration details:
- Field type (text, numeric, yes/no, tags)
- Field visibility setting
- Display toggle states (show in list, show in form)
- Default value (if any)
- Screenshots showing the issue (the Custom fields settings page and/or where the field should appear)
- Steps you've already taken to resolve the issue
- Your user role (Vendor or Partner)
- The specific page or form where you're experiencing the issue
This information helps the support team diagnose and resolve issues more efficiently.