Exemplary use case of custom fields
This section walks through a complete example of creating a custom lead field, enabling it in forms and lists, and using it to filter leads. This demonstrates the full power of custom fields in action.
Scenario: Creating a "Lead Source" Tracking Field
Let's create a custom field to track where leads come from, enable it in both the lead form and list view, and then use it to filter leads.
Step 1: Create the Custom Field
- Navigate to Administrator Panel > Custom fields
- Scroll to the Custom lead fields section
- Click Add new field
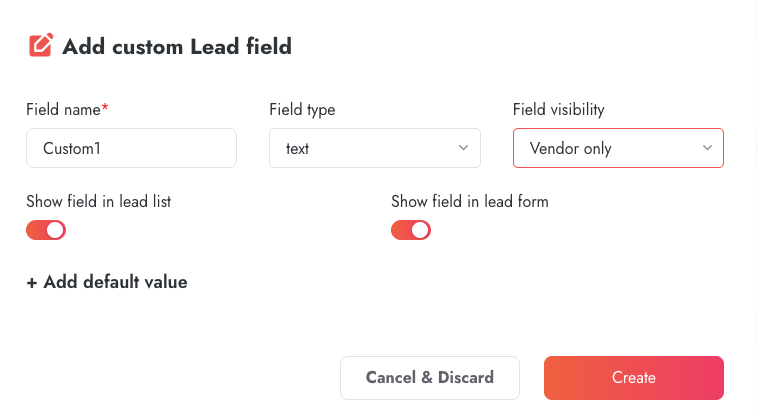
- Configure the field:
- Field name: "Lead Source" (or "Custom1" as shown in the interface)
- Field type: Text (or Tags if you want predefined options)
- Field visibility: Vendor only
- Show field in lead list: Toggle ON (enabled, turns red)
- Show field in lead form: Toggle ON (enabled, turns red)
- Click Create
Result: The custom field is now created and ready to use in both forms and lists.
Step 2: Use the Field in Lead Creation Form
- Navigate to Add Lead (click the Add Lead button or menu item)
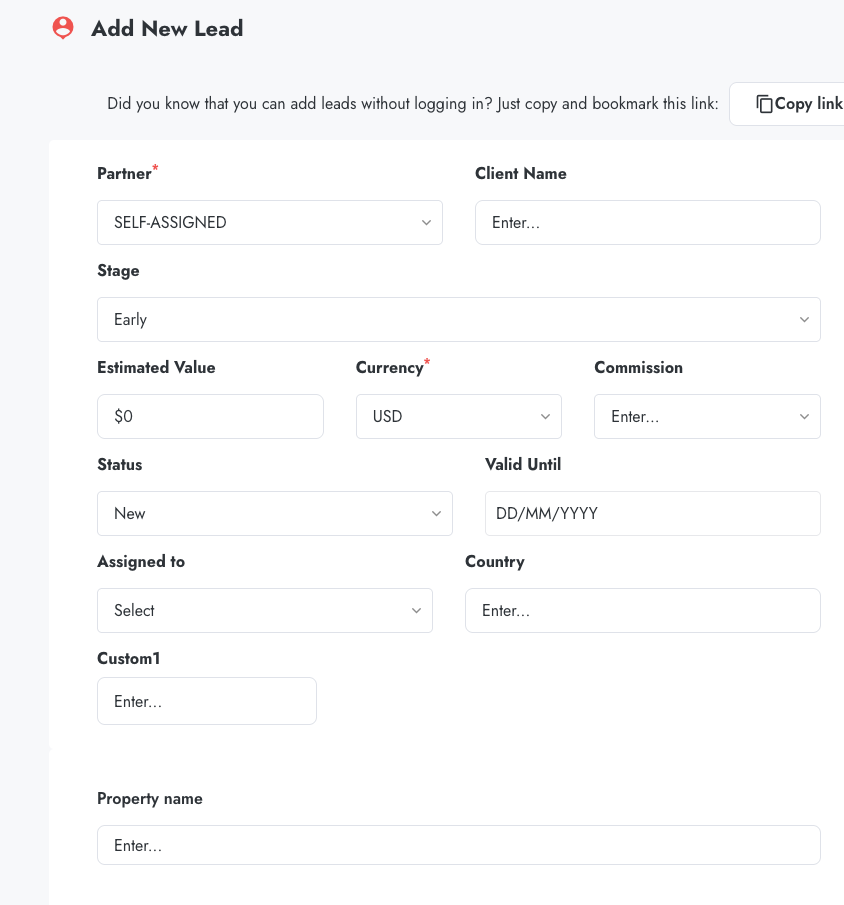
- Fill in the standard required fields:
- Partner (e.g., "SELF-ASSIGNED")
- Client Name
- Stage (e.g., "Early")
- Estimated Value, Currency, Commission
- Status, Valid Until, Assigned to, Country
- Scroll down to find your custom field (e.g., Custom1 or Lead Source)
- The field appears with an "Enter..." placeholder
- Enter a value, for example: "test pola" or "Website Contact Form"
- Complete any remaining fields (like Property name if required)
- Click submit to create the lead
Result: The lead is created with the custom field value saved. You can verify this by opening the lead details page and seeing your custom field value displayed.
Step 3: Enable the Field in Lead List View
Important: Even though you enabled "Show field in lead list" when creating the field, each user must individually add it to their personal table configuration to see it as a column.
- Navigate to your Lead List
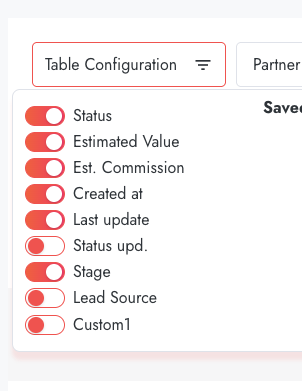
- Click the Table Configuration button (top left, shows icon with three horizontal lines)
- A panel opens showing all available columns with toggle switches
- Scroll through the list to find your custom field (e.g., Custom1)
- Custom fields typically appear at the bottom of the list, after standard fields like:
- Status
- Estimated Value
- Est. Commission
- Created at
- Last update
- Status upd.
- Stage
- Lead Source
- Find your custom field and toggle it ON (switch turns red when enabled)
- Click outside the panel or close it
Result: The custom field column now appears in your lead list table, positioned to the right of the Stage column. You can see the values for all leads that have this field populated.
Step 4: Filter Leads by Custom Field
- In the Leads list, ensure your custom field column is visible (from Step 3)
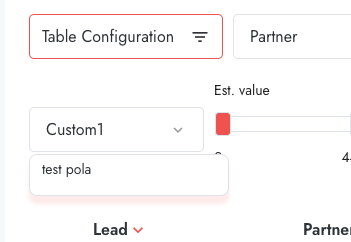
- Click on the custom field column header or use the filter panel
- A filter dropdown appears showing your custom field name (e.g., "Custom1")
- Below the field name, you'll see a text input field
- Enter the value you want to filter by, for example: "test pola" or "Website"
- The system filters in real-time or click apply if there's an apply button
- A Reset Filters button appears with a count indicator showing active filters
Result: The lead list now shows only leads where the custom field contains your filter text. The filter supports partial matches, so filtering by "test" would match "test pola".
Step 5: View and Work with Filtered Results
After applying the filter, you'll see:
- Filtered lead list: Only leads matching your filter criteria are displayed
- Custom column visible: Your custom field column shows the matching values (e.g., "test pola")
- Standard columns: All other enabled columns (Lead, Partner, Status, Est. value, Est. Commission) remain visible
- Filter indicator: The active filter is shown, typically with a count badge or highlighted filter button
- Sortable column: You can click the custom field column header to sort by that field
Understanding the Complete Flow
The workflow demonstrates how custom fields are:
- Hidden by default: After creation, custom fields don't automatically appear in everyone's table view
- User-configurable: Each user enables the columns they want to see
- Available for filtering: Once enabled in table configuration, the field becomes filterable
- Persistently configured: Your table configuration and filters persist across sessions
Common Workflow Variations
Variation 1: List-Only Field (No Form Display)
Configuration: "Show field in lead form" is disabled (OFF)
Workflow:
- Create lead normally (custom field doesn't appear in Add Lead form)
- Lead is created without custom field value
- Open lead details page
- Locate and edit the custom field directly in details view
- Save the value
- Enable column in table configuration to see values in list
- Filter by the field as needed
Use case: Fields populated later in the lead lifecycle, such as:
- Qualification scores (calculated after lead review)
- Assessment results (added after partner evaluation)
- Follow-up dates (determined after initial contact)
- Internal ratings or tags (added by sales team)
Variation 2: Form-Only Field (No List Display)
Configuration: "Show field in lead list" is disabled (OFF)
Workflow:
- Field appears in Add Lead form
- Users populate it during lead creation
- Value is saved with the lead
- Field appears only on lead details pages
- Field is NOT available in table configuration
- Field cannot be used for filtering in list view
Use case: Reference information that doesn't need filtering:
- Detailed notes or comments
- Secondary contact information
- Project descriptions
- Internal reference codes
Variation 3: Details-Only Field
Configuration: Both toggles disabled (OFF)
Workflow:
- Field doesn't appear in Add Lead form
- Field doesn't appear in table configuration
- Field only visible on lead details pages
- Must edit field directly in lead details
- Useful for reference data only
Use case: Rarely used reference fields:
- Historical information
- Archive references
- Migration data from old systems
Variation 4: Partner-Visible Field
Configuration: Field visibility set to "Vendor and partner"
Workflow changes:
- Partners see the field in Add Lead form (if form toggle is ON)
- Partners see the field in lead details pages
- Partners can edit field values
- Partners can enable the column in their table configuration
- Partners can filter by this field in their lead lists
Use case: Collaborative information:
- Project timeline (partners need to see and update)
- Technical requirements (partners provide details)
- Opportunity type or category
- Customer industry or segment
Workflow Best Practices
For Optimal Filtering
- Always enable "Show field in lead list": This is essential for filtering. If disabled, the field cannot be added to table configuration or used in filters
- Use Tags field type for consistent filtering: For fields with limited options (Lead Source, Priority, Region), use Tags with predefined values like "Option 1; Option 2; Option 3" to ensure everyone uses the same values
- Communicate to users: Remind team members they must enable custom columns in Table Configuration before they can filter by them
- Create filter documentation: Document what values are used in Tags fields so users know what to filter by
- Test filters: After creating a field, test the complete workflow to ensure filtering works as expected
For Form Efficiency
- Be selective with form fields: Only enable "Show field in lead form" for fields that must be captured at lead creation. Too many fields make forms lengthy
- Set default values for Tags: When Tags fields appear in forms, define all options in default value to create a dropdown menu
- Order matters: Custom fields appear after standard fields in the form, so prioritize which ones are form-enabled
- Consider partner experience: If partners create leads, avoid vendor-only fields in forms or clearly mark what's required
For Data Quality and Consistency
- Prefer Tags over Text: Tags (dropdown) fields enforce standard values, preventing typos and inconsistencies
- Document expected values: For text fields, provide examples or guidelines so users enter consistent data
- Regular data audits: Periodically review custom field usage to ensure data quality
- Train users on the workflow: Show team members the complete process from creation to filtering
- Start small: Create one or two fields, verify the workflow works, then add more as needed
Troubleshooting the Workflow
-
Field Created But Not Visible in Form
Check:
- Is "Show field in lead form" toggle enabled (ON/red)?
- Are you viewing the correct form (some systems have multiple lead forms)?
- Have you refreshed the page after creating the field?
-
Field Not Appearing in Table Configuration
Check:
- Is "Show field in lead list" toggle enabled (ON/red)?
- Have you saved the field after enabling the toggle?
- Try refreshing the lead list page
- Scroll to the bottom of Table Configuration - custom fields appear last
-
Cannot Filter by Custom Field
Check:
- Have you enabled the column in Table Configuration first?
- Is "Show field in lead list" toggle ON?
- Does at least one lead have a value in this field?
- Try closing and reopening the filter panel
-
Filter Returns No Results
Check:
- Are you searching for the exact value (filters may be case-sensitive)?
- Try searching for a partial match
- Verify leads actually have values in this field
- Check for trailing spaces in the field values
-
Other Users Can't See the Custom Field
Remember:
- Table Configuration is per-user - each person must enable columns individually
- Show users where to find Table Configuration button
- Confirm they're scrolling far enough to see custom fields in the list
Example: Complete Implementation
Let's look at a real implementation based on the "Custom1" field shown in the product interface:
| Step | Action | What You See |
|---|---|---|
| 1. Create | Add custom lead field named "Custom1", enable both toggles | Field appears in Custom lead fields table |
| 2. Form | Go to Add New Lead | "Custom1" field with "Enter..." placeholder appears in form |
| 3. Populate | Enter "test pola" in Custom1 field and create lead | Lead created with Custom1 = "test pola" |
| 4. Enable Column | Open Table Configuration, find Custom1, toggle ON | Custom1 column appears in lead list to right of Stage |
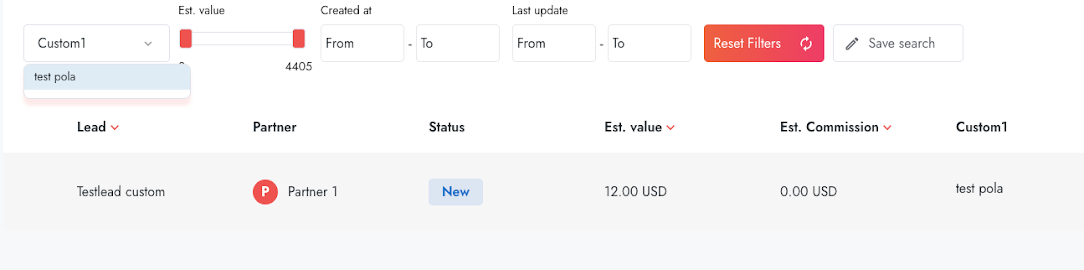
| 5. Filter | Click Custom1 filter, enter "test pola" | Only leads with "test pola" in Custom1 field are shown |
| 6. Results | View filtered list | Lead list shows: Lead name, Partner, Status, Est. value, Est. Commission, Custom1 (with "test pola") |
Summary: Key Workflow Points
- Creation: Configure field with appropriate toggles based on intended use
- Visibility: "Show in list" enables filtering; "Show in form" enables lead creation capture
- User Control: Each user enables columns individually via Table Configuration
- Filtering: Column must be enabled before filtering is available
- Flexibility: Different toggle combinations create different workflow patterns
This complete workflow demonstrates the power and flexibility of custom fields in Partnerplace, enabling you to capture, organize, and filter data exactly as your business requires.