Tasks module in Partnerplace

The Tasks module in Partnerplace allows vendors and partners to create, manage, and assign tasks to team members within the context of leads and partnerships. This feature helps streamline workflow, track action items, and maintain clear communication across your partner network.
Tasks in Partnerplace can be created and managed in multiple contexts:
- Lead Tasks: Tasks assigned to specific leads that are visible only within that lead's details page. These tasks are associated with lead-specific activities and help track progress toward closing opportunities.
- Partner Tasks: Tasks assigned to partners or partner relationships that appear in partner details and the main tasks inbox.
- Global Task Inbox: A centralized view where users can see all tasks assigned to them or created by them, regardless of whether they're associated with leads or partners.
Accessing the Tasks Module
Tasks can be accessed from multiple locations within Partnerplace:
- Navigate to the Inbox at the top of the menu and click on Tasks to view your global task list. This view displays all tasks assigned to you or created by you across all leads and partners.
- Access lead-specific tasks by opening a lead details page and scrolling to the Tasks section. This view displays only tasks associated with that particular lead.
- View partner-specific tasks from the partner details page, where you'll see tasks related to that partnership.
Creating a New Task
Creating Tasks from Lead Details

When you create a task from within a lead details page, the task is automatically assigned to that lead and will only appear in that lead's task list (not in the global inbox for vendors).
- Click the Add new task button located at the top of the tasks section in the lead details page.
-
The task creation form will open with the lead assignment pre-selected.

Creating Tasks from Inbox

When creating a task from the inbox/tasks view:
- You'll see a toggle at the top of the popup allowing you to choose between creating a Lead task or a Partner/Vendor task.
- Select Lead to assign the task to a specific lead, or select Partner (for vendors) or Vendor (for partners) to create a partnership-level task.

Task Assignment Rules
Task assignment follows specific rules based on user roles:
For Vendor Users
When creating a lead task, the user assignment dropdown includes:
- All vendor users
- All users from the partner associated with that lead
This enables cross-user type level collaboration on lead-related activities.
For Partner Users
When creating a lead task, the user assignment dropdown includes:
- All users from the partner organization
- The Partner Manager assigned from the vendor side
- Any user assigned to the lead under "Assigned to" (if different from the Partner Manager)
Multiple Assignment: Multiple users can be assigned to a single task, enabling team collaboration. All assigned users will receive notifications and can view the task in their inbox.
Task Content and Settings
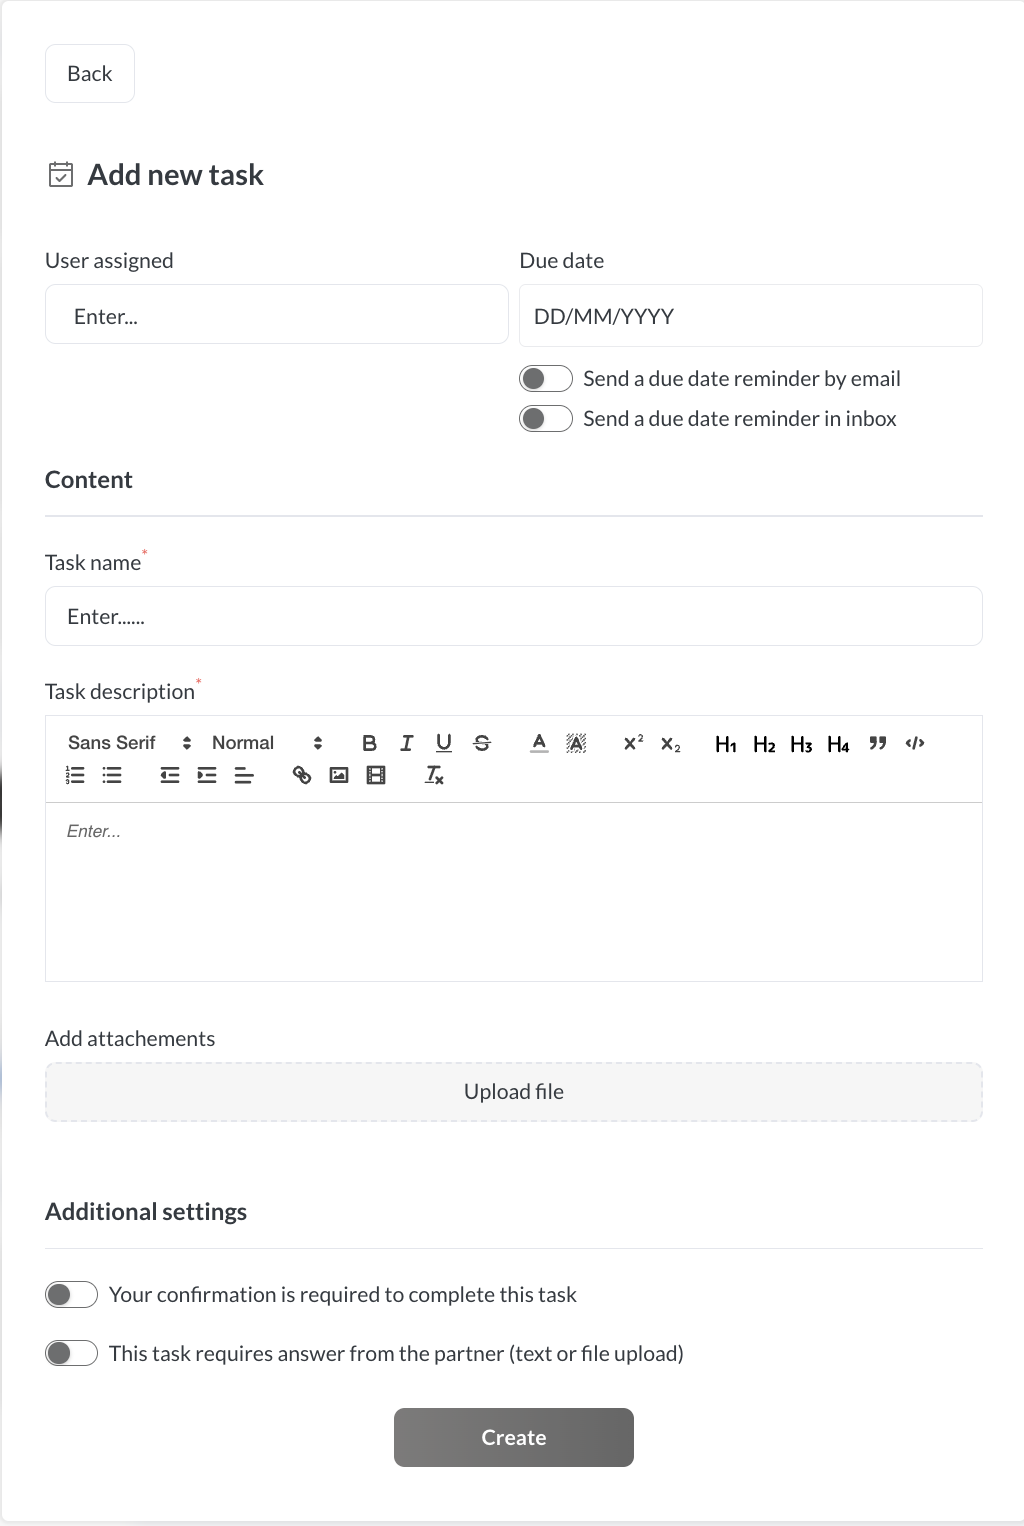
Basic Task Information
- Task Name (required): Enter a descriptive title that clearly identifies the task purpose.
- Task Description (required): Use the rich text editor to provide detailed instructions, context, and requirements. The editor supports formatting including bold, italic, underline, headers (H1-H6), bullet points, numbered lists, and hyperlinks.
- User Assignment: Select one or more users to assign the task to using the multiselect dropdown. Assigned users will receive email notifications (unless they're assigning the task to themselves).
Due Date
Set a deadline for task completion.
Enable two types of reminders:
- Send a due date reminder by email: Sends an email notification to assigned users on the due date
- Send a due date reminder in inbox: Creates an inbox notification for assigned users on the due date
Note: Email notifications are sent only to users assigned to the task, not to the user creating the task for themselves.
Attachments
Upload files directly to the task using the Upload file button under the "Add attachments" section. Attachments help provide necessary resources, documentation, or context for task completion.
Additional Settings
- Your confirmation is required to complete this task: When enabled, the task requires explicit confirmation from assigned users before it can be marked as complete.
- This task requires answer from the partner (text or file upload): When enabled, partners must provide a response (either text or file attachment) when completing the task. This ensures deliverables are captured and documented.
Managing and Editing Tasks
Viewing Task Details
Click on any task in the list to expand and view its full content, including description, attachments, assigned users, and due date. Tasks can be viewed inline within the lead details page or in a popup modal.
Editing Tasks
Both vendor and partner users can edit tasks they have created. To edit a task:
-
Click the three dots (...) menu on the right side of the task (next to the user avatar).

- Select Edit task from the dropdown menu.
- The edit form will open with all current task information pre-filled.
- Make your changes and click Save Changes (note: the button changes from "Create" to "Save" when editing).

Important: Each task modification is automatically recorded on the lead's timeline to maintain a complete history of changes.
Deleting Tasks
To delete a task:
- Click the three dots (...) menu on the right side of the task.
- Select Delete task.
Task deletions are also recorded on the lead timeline for audit purposes.
Task Status and Filters
Tasks display with status indicators:
- New: Newly created tasks that haven't been started
- Done: Completed tasks
Use the filter buttons at the top of the task list to view:
- All: Display all tasks regardless of status
- To Do: Show only active tasks (New and In Progress)
- Done: Show only completed tasks
User Avatars and Assignment Visibility
Tasks display user avatars next to each task to indicate who is assigned. When multiple users are assigned to a task, multiple avatars appear side-by-side.
To see who is assigned to a task:
- Hover over the avatar to see the user's name and email address, OR
- Check the "Assigned to" section at the bottom of the opened task details, which lists all assigned users (e.g., "Assigned to: Username1, Username2")
By default, if a user hasn't uploaded a custom avatar, the system displays their initials. Users can upload custom avatars from their profile settings (accessible next to the company logo in /my branding in general settings or by clicking on the profile area).
Task Timeline Integration
All task-related actions are automatically recorded on the lead timeline:
- Task Creation: When a new task is added to a lead, a timeline entry appears with the format "New Task '[taskname]' was added to lead '[leadname]'"
- Task Modification: Any changes to task details (due date, description, assignments, etc.) are logged on the timeline
- Task Deletion: When a task is removed, this action is recorded to maintain a complete audit history
Timeline entries include the date, time, and user who performed the action.
Email Notifications
The Tasks module sends automated email notifications for key events:
Task Assignment Notifications
When a task is assigned to a user, they receive an email with the subject line "[LeadName] - Task Reminder" (where LeadName is dynamically populated).
The email body states: "New Task '[taskname]' was added to lead '[leadname]'"
Due Date Reminders
If due date reminders are enabled, users receive notifications on the task due date. The reminder email includes the message:
"Don't forget to complete the task '[taskname]' for lead '[leadname]' before '[duedate]'"
Reminders are sent only to users assigned to the task, not to the task creator (unless they also assigned the task to themselves).
Task Visibility Rules
Lead Task Visibility
Tasks created for leads follow specific visibility rules:
- Tasks assigned to a specific lead appear only in that lead's details page, not in the main vendor task inbox. This prevents clutter and ensures vendors see only high-level tasks in their global inbox.
- Each lead displays only the tasks specifically assigned to it, not a global list of all tasks. This ensures users see relevant, context-specific tasks when working with each lead.
Global Task Inbox Visibility
The Tasks tab in the main inbox displays:
- All tasks assigned to the logged-in user, regardless of which lead or partner they're associated with
- All tasks created by the logged-in user, enabling them to track tasks they've delegated to others
This centralized view helps users manage their workload across all leads and partnerships simultaneously.
Internal Tasks for Partners
Partners can create internal tasks within leads for their own team members. These tasks are visible only to partner users and follow the assignment rules outlined above (all partner users, plus the vendor Partner Manager and lead assignee if different).
This functionality enables partners to manage their internal workflow while collaborating with vendors on lead progression.
Best Practices
- Provide Complete Context: When creating tasks, provide detailed descriptions and attach relevant files to give assignees complete context. The more information available, the more efficiently tasks can be completed.
- Use Due Dates Strategically: Set due dates and enable reminders for time-sensitive tasks. Color-coded date indicators help users prioritize their workload at a glance.
- Enable Collaboration: Assign multiple users to collaborative tasks that require input from different team members. This ensures everyone stays informed and can contribute.
- Review Timeline History: Regularly review the task timeline on lead details pages to understand the history of activities and modifications. This audit trail supports accountability and project management.
- Keep Tasks Current: Mark tasks as complete promptly to keep task lists current and maintain accurate progress tracking. Complete tasks can still be viewed using the "Done" filter if historical reference is needed.
Troubleshooting
-
Tasks Not Appearing in Expected Location
Issue: A task created for a lead doesn't appear in the main vendor inbox.
Solution: This is intentional behavior. Lead-specific tasks appear only in the lead details page to reduce inbox clutter. Vendors see lead tasks only when viewing that specific lead.
-
Cannot Edit Task Multiple Times
Issue: After saving a task edit, the save button shows a timer or becomes grayed out.
Solution: Wait a few moments for the system to complete the save operation. If the button remains disabled, refresh the page and try again. This may indicate a synchronization delay.
3.User Avatars Not Displaying
Issue: Tasks show generic icons instead of user photos.
Solution: Users need to upload custom avatars in their profile settings. Navigate to /my branding in general settings or click on the profile area to upload an avatar. If no custom avatar is set, the system displays initials by default.
-
Task Reminders Not Received
Issue: Assigned users don't receive due date reminder emails.
Solution: Verify that "Send a due date reminder by email" is enabled when creating or editing the task. Check that the due date is set correctly and hasn't passed. Confirm that assigned user email addresses are valid.
-
Task Modifications Not Appearing on Timeline
Issue: Task edits or deletions don't create timeline entries.
Solution: Ensure you're viewing the correct lead details page. Timeline entries are created automatically for all task actions (creation, modification, deletion). If entries are missing, this may indicate a system issue that should be reported to support.
Getting Support
If you continue to experience issues after trying these troubleshooting steps, please contact Partnerplace support at support@partnerplace.io.
When contacting support, please provide:
- A detailed description of the issue
- Steps to reproduce the problem
- Screenshots if applicable
- The specific lead name or task name involved
- Your account information (username/email)
- Timestamp when the issue occurred
This information helps the support team diagnose and resolve issues more efficiently.